If you manage complex facilities or fast-moving projects, consolidating your data is essential. SiteMap® simplifies things by combining scattered files into a single interactive GIS mapping software. When your aerial imagery, as-builts, point clouds, and inspection photos are on one layered map, it offers more than convenience. It gives you clarity.
You can skip chasing down folders or emailing large files. Instead, compare verified field locates with old records. This can help you spot conflicts early and share accurate context with all stakeholders. This guide shows you how to import data into SiteMap step by step. It explains the best file types to use. Plus, it shows you how to make your data useful and valuable from day one.
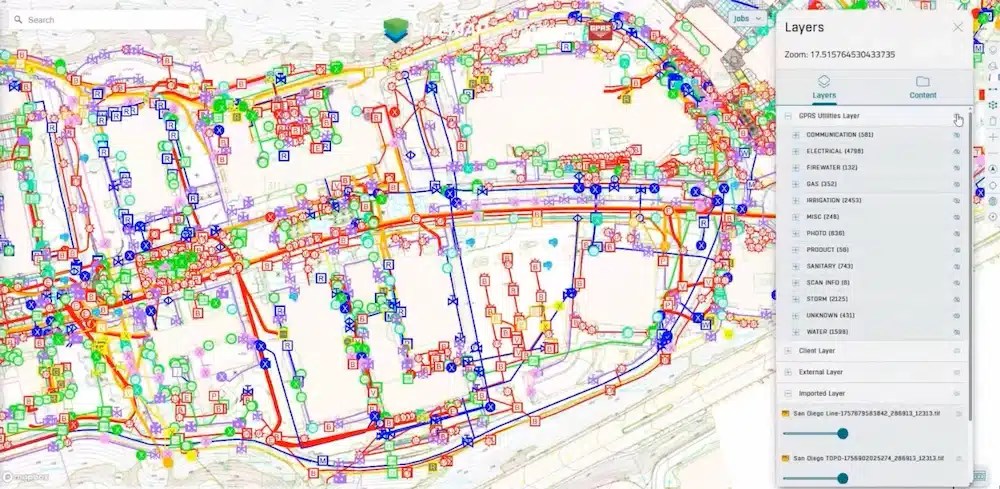
Once you import data into SiteMap, it transforms into an interactive map featuring layered utilities, high-fidelity imagery, and geo-tagged records. This image shows how you can toggle multiple layers, like electrical, water, and gas, for a full view of site conditions.
Why Imports Matter
During a Feature Friday webinar, the team described data as the information you use to set benchmarks, share insights, and guide decisions. Importing and centralizing this information with proper georeferencing and versioning turns static files into dynamic solutions. You can compare verified field locates with older records, resolve conflicts early, and provide every stakeholder with a clear, unified view of the project context.
The Import Experience in SiteMap
Importing into SiteMap is intentionally straightforward. You send a request, usually by email, to the SiteMap Supports team. They review your files, choose the right import pathway, and publish them to the platform, often within hours. That means you can start working with your data the same day. Behind the scenes, the team handles versioning, layering, and alignment, so everything is accurate and ready to use.
SiteMap Support also normalizes your inputs, converting CAD into web-viewable layers, imagery into tiles, and models into browser-friendly viewers. They set coordinate systems and align all content to project control points. This way, you can compare what is on paper with what GPRS has verified in the field.
Want to see how importing data works in real time? Watch our on-demand webinar and learn how SiteMap turns your records into interactive GIS solutions.
What Can You Import
Most client needs fall into three main categories:
Aerial and Site Imagery
-
- Drone flights create 2D orthomosaics and 3D renderings. These offer a clear, high-resolution view of your site and can capture surface markings, like post-locate paint or flags, for lasting context.
Drawings and Maps
-
- CAD files (e.g., DWG), topographic surveys, and legacy as-builts can be converted into web-friendly formats such as PDFs or layered vectors. Once aligned to your project’s control, you can toggle layers and compare them to verified locates.
3D Models and Reality Capture
-
- Point clouds and other 3D models are rendered for easy navigation. They’re accessible without specialized CAD skills and display alongside 2D context for a complete view. You can pan, zoom, and access details without specialized software.
Every imported layer is stackable. You can dim basemaps, control visibility, and zero in on the details that matter most for your decision window.
Step‑by‑Step: Importing into SiteMap
1) Email your request and files to SiteMap Support
Include:
- Project name
- Site location
- Data types you’re sending (e.g., DWG, PDF, LAS/LAZ, TIFF/GeoTIFF, JPG)
- The outcome you want (e.g., “compare these as‑builts to last month’s GPRS locates,” “publish topo with elevation labels,” “add a current drone ortho”).
Support will confirm details and outline the import pathway.
2) Normalization, versioning, and georeferencing
The team versions your submission, converts formats as needed, and geolocates each layer using site control, RTK, and other references so line work and imagery land precisely where they should. For drone flights, they’ll place ground targets and use control points for tight alignment.
3) Publish and verify in SiteMap
Most imports go live within hours. You can toggle layers, dim backgrounds to emphasize line work, and start comparing legacy drawings to validated conditions.
Practical Examples
Drone Orthomosaic with Utility Locates
- A high-resolution aerial image layered with verified utility line work gives teams a crystal-clear view of current site conditions. This makes planning easier and helps contractors avoid surprises.
Topographic Base Layer
- Importing a topo map with elevation data provides critical context for grading and drainage decisions. Dim aerial backgrounds to keep line work clean and readable.
Legacy As-Builts vs. Verified Conditions
- Older drawings often contain useful building footprints but incomplete utility details. Comparing them to verified locates exposes discrepancies before they become costly field issues.
Point Clouds for Everyone
- Rendered 3D models allow any team member, not just CAD specialists, to pan, zoom, and measure without heavy desktop tools. Combined with 2D layers, they deliver a complete picture of your infrastructure.
Making Imported Data Interactive
Geo-tagged pins link files, notes, photos, and other artifacts directly to your map, turning it into an interactive index of institutional knowledge. This is especially valuable for capturing insights from team members who are retiring or transitioning because it preserves critical context that might otherwise be lost. The benefit comes from improved continuity and faster decision-making during outages, incidents, and planned work.
You’ll also see camera icons where GPRS field teams captured photos. These images auto-populate and are accessible right from the map. If you have external photos, the Support team can place them in the correct location for you. A self-service upload feature is currently in development.
Want to dive deeper into importing workflows? Watch the webinar replay to learn best practices for importing files into SiteMap, managing layers, and creating interactive GIS solutions that scale with your portfolio.
File Prep Tips
When preparing files for import, start by sharing source formats whenever possible. Native files, like DWG (with CTB and fonts), GeoTIFF (with world files), and uncompressed point clouds, maintain accuracy. They also cut down on unnecessary back-and-forth. If PDFs are your only option, send the highest resolution available. This will help maintain clarity.
It’s also important to include coordinate information and any site control data. Details such as EPSG codes, survey reports, or control points speed up accurate placement and cut manual alignment. For drone deliverables, ask about adding ground control targets for the next flight. This simple step can improve geospatial accuracy.
The Quality of Background Imagery
If your default basemap looks dated or low‑resolution, you have options. Import a new drone orthomosaic for a current, high‑detail view. Or provide updated imagery for the Support team to align and publish. The key principle is simple: your verified line work and site control are the authoritative reference. Every image ties back to that, so comparisons stay accurate, even when background layers change.
Access, Plans, and Support
Every GPRS project is delivered through SiteMap. Start by creating a free account to access the GIS platform and view your projects. From there, the SiteMap Support team can help you with imports, layering, and geo‑tagging. They’ll help you choose the right plan if you need ongoing support. This includes advanced features, like managed photo placement, while client uploads are being finalized.
The Sitemap Support team is ready to assist you. They can answer your questions and guide you step by step.
From Files to Solutions
With SiteMap, importing data means instant progress. Your records become interactive solutions your team can trust. High‑fidelity images and layered utilities reveal current conditions. Verified GPRS data checks against old drawings, helping to spot conflicts early. Geo‑tagged notes, photos, and attachments make your map a dynamic record system. Sharing is simple: one link, one language, no email chains or oversized files. And as your portfolio grows, the same workflow adjusts to fit your needs. Because adaptable software ensures your projects stay connected. It ensures every file becomes actionable insight.
Click below to schedule your live, personal SiteMap demo today!
FREQUENTLY ASKED QUESTIONS
- How do I export data from SiteMap?
Exporting is simple. From your Digital Plan Room or Map Viewer, you can download files in formats like DWG, PDF, or orthophotos. This lets you take interactive maps and records from SiteMap into CAD, GIS, or other software without disrupting your workflow.
- Can SiteMap scale as my portfolio grows?
Yes. SiteMap was created to accommodate scalability. Whether you oversee a single facility or a nationwide portfolio, the platform merges your data into one interactive system. You can keep adding new projects using the same workflow. This lets you expand without changing your process.
- How secure are my records in SiteMap?
SiteMap uses a cloud-based setup with controlled access permissions, so your data stays safe and recoverable. All files, maps, and attachments are stored in one central location. This makes collaboration simple and cuts the risk of losing data.