Exporting a Job from SiteMap
Managing subsurface utility data and facility maps is only half the battle. Real value comes when you can easily move that information into the places where design and construction decisions are made. Whether your team works in CAD, GIS, or a hybrid workflow, having a clear, repeatable process for exporting accurate records from SiteMap ensures interoperability, reduces risk, and keeps projects moving. In this guide, we’ll break down how to make that transfer simple and reliable.
Click here to register for the next Feature Friday Webinar.
What Does “Exporting a Job” Mean in SiteMap?
In SiteMap, a job represents all the records and deliverables tied to a specific project boundary, usually the result of a subsurface utility locate performed by GPRS. When you export a job, you’re converting the interactive map view into industry‑standard file formats that downstream platforms can use without friction. This process packages mapped utilities, geometry, and associated data so they’re ready for CAD, GIS, or other design environments.
Think of it as unlocking your SiteMap data for broader collaboration and data portability across platforms. Once exported, these files can be shared with design teams, external contractors, or your GIS administrator, ensuring everyone works from the same accurate, verified information.
Full View vs. Targeted Selection
Before you hit export, decide how much data you need:
- Export Current View: Captures everything visible in your map viewport. Perfect for a quick, complete snapshot of the area you’re reviewing. One click, the system processes, and you download a ZIP containing your chosen file type (e.g., DXF).
- Export by Drawing a Selection: Sketch a polygon around exactly what matters – maybe a parking lot edge or just the utilities near a building – and export only that subset. This keeps downstream files lightweight and context‑specific (think KML for a contractor scoping work on one corner of campus).
Want to see a time‑saving tip? Watch the video replay to learn about the handy “Find My Location” button that jumps you straight to your site before exporting.
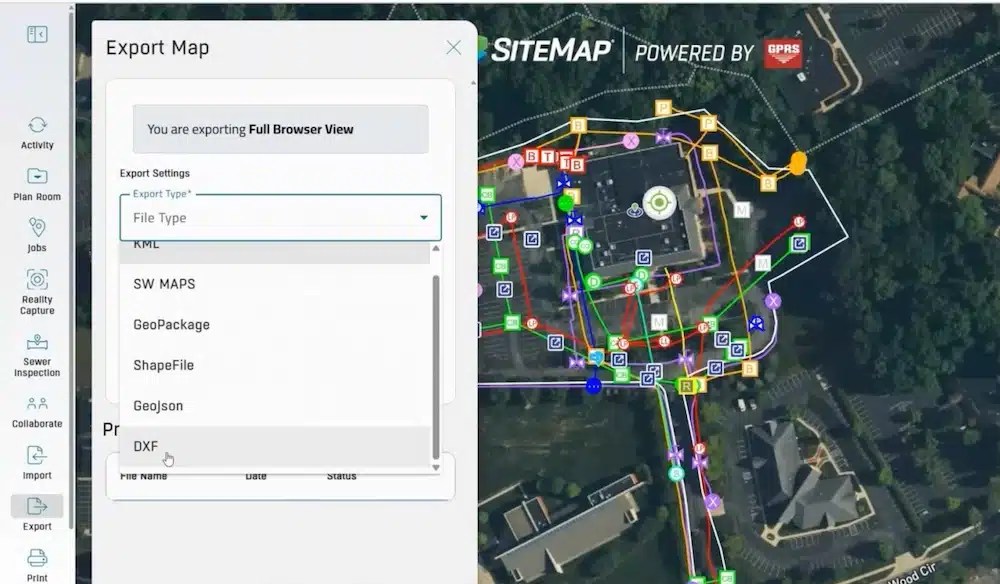
File Formats That Fit Your Workflow
Your export format should match where the data is headed next. SiteMap gives you the flexibility to choose CAD‑friendly or GIS‑friendly outputs so your team can work without conversion headaches:
- DXF for CAD ecosystems (AutoCAD, Civil 3D, MicroStation): Ideal for designers who need precise line work, layers, and geometry inside their drawings.
- Shapefile or GeoJSON for GIS (including Esri® workflows): Perfect for managing enterprise geodatabases or building interactive web maps.
- KML/KMZ for quick visualization (Google Earth/Maps): Great for field coordination and stakeholder reviews when a lightweight, easily shared map is all you need.
Data portability made simple. Export your map your way. SiteMap supports DXF, Shapefile, GeoJSON, and KML so your data moves effortlessly into CAD, GIS, or other visualization tools.
What If Your Team Works in a GIS Environment?
Many organizations ask whether SiteMap integrates directly with enterprise GIS platforms. The answer: integration is simple and standards‑based. You can export your data as a Shapefile or GeoJSON, then import it into your preferred GIS system. This export/import workflow is reliable and easy to audit. It meets most data governance needs, and you do not need an always-on API.
For teams needing more than outbound data, SiteMap Pro accounts offer a solution. You can import external layers like plan sheets, drone images, and other raster or vector files. This capability brings everything into one interactive environment, reducing silos and improving collaboration.
Single vs. Batch Exports: How to Think About Scale
Exporting one job versus several may look similar. There is one key difference, and that lies in visibility and control. Individual exports are straightforward, ideal for personal users who need a quick handoff. When projects span many scopes, layered exports become critical.
SiteMap Project, Pro, and Team accounts let you toggle layers between jobs. You can choose what to show and export only what matters. This approach can minimize clutter, reduce post‑processing, and keep your downstream files clean and relevant.
The Takeaway: Match your account level to your coordination needs. If you often combine scopes or handle complex sites, layered control helps with accuracy and efficiency.
Sharing Data Beyond Your Organization
Once your export is done, SiteMap provides you with a downloadable file. You can share it however you like. For small packages, you might use email. For larger datasets, you may decide to use a secure file transfer.
If you want to share on the platform, SiteMap lets you share jobs with other users. This feature is available through professional account tiers for easy team-wide access. This approach can help reduce version sprawl and keep your records consistent.
Want to dive deeper into sharing mechanics? Watch the webinar replay for details on native sharing options and best practices for controlled access.
Annotations, Notes, and Collaboration
Right now, standard exports include the geometry and attributes GPRS collected on site. User‑authored notes created elsewhere aren’t embedded by default in exports. For collaboration that includes markups or plan callouts, Pro accounts can import georeferenced files with notes (e.g., DWG, KMZ, plan sheets) to overlay in SiteMap. That approach keeps your operational context inside the same interactive software view while preserving the chain of custody on official records.
A Quick Export Workflow
Here’s a concise playbook you can standardize across your team to move from SiteMap to delivery‑ready files:
- Confirm scope: Decide between the viewport and the drawn selection. Smaller, targeted exports keep design models lean and reduce rework later.
- Pick format by destination: DXF for CAD, Shapefile/GeoJSON for GIS, KML/KMZ for lightweight viewing and stakeholder updates.
- Name consistently: Include site, date, and scope (e.g., “HQ_ParkingLotA_2025‑10‑14_DXF”). Your records team will thank you.
- Download and validate: Open the file in the target software to spot layer/coordinate issues early. If you’re combining layers, use Project/Team/Pro capabilities to curate visibility before export.
Why This Matters for Operations and Risk
Exportability is a lever for productivity and risk management. Interoperability reduces bottlenecks by allowing you to move SiteMap data into CAD or GIS without custom conversions. This helps avoid delays, especially when construction windows are tight.
Right-sized deliverables also make a difference. Targeted exports cut down on information overload for field crews and contractors. This way, everyone focuses only on what matters for the work package. This clarity improves efficiency and reduces the chance of costly mistakes.
Traceable records are another critical benefit. Standardized exports provide a clear audit trail. They show what was shared, when it happened, and the project scope. For fast-moving projects, this level of documentation is essential for accountability and compliance.
Together, these capabilities help safeguard timelines, control costs, and reduce the risk of errors. In doing so, they help keep safety and project success secure.
Bringing It All Together
Exporting from SiteMap is straightforward: choose your scope, select the format, process it, and download. This simple workflow turns an interactive map into reliable project records your teams can trust.
Whether you’re handing off a DXF to a designer, a KML to a superintendent, or a Shapefile to your GIS analyst, SiteMap delivers practical solutions. They fit seamlessly into your workflows, helping collaboration run smoothly and keeping projects on track.
Click below to schedule your live, personal SiteMap demo today!